If you’re a language teacher, then the abilities to both make and edit various audio recordings will prove to be fundamental skills that you need.
Recently, doing audio recording has gotten more standardized than it used to be, but it’s simultaneously a little more restricted, so it’s relatively agnostic in terms of platforms.
This content is going to cover a number of the basics you will need to know when getting started.

There are plenty of tutorials you can find online, but if you’re looking for a specific recommendation, then the Audacity manual at http://manual.audacityteam.org/o/ is a good place to start.
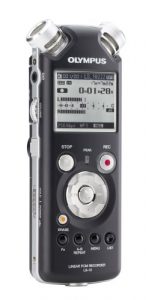
At our language center, we utilize a broad variety of devices, from a Zoom we use to do test prompt recordings, to a small Sony used for placement testing, and even a Peak 7 on our Mac Pro for doing test constructions. My personal favorites in terms of classroom materials include an Olympus LS-10, and I do editing using Audacity. Smartphones do work out pretty well, and basic recording is possible with some feature phones, although the quality isn’t great.
 On top of making recordings of other people or just yourself, it can be handy to have some audio clips from online or local media. That used to be pretty simple, in Windows XP at least, but now it’s, unfortunately, harder to record any audio that your computer is playing into another application that’s running on that same computer. It’s not physically impossible, but Apple and Microsoft have both pretty much wiped out nearly every way in which we used to do this.
On the other hand, while you’re not going to get totally perfect digital copies of audio, you can still get recordings that are adequate enough. The trick is having access to a secondary device for the recording and then having a connector that builds a link between the audio source output to the input of the recording device. Adjusting the source output so it doesn’t wind up overwhelming the recording device’s input can be rather tricky, and actually, it can be downright difficult to occasionally impossible, especially if the recorder’s input level is too high and you can’t adjust it. It can also help out a lot if you’re able to somehow monitor the source, either via some recording device output or just directly.
As I mentioned earlier, I like to use an Olympus LS-10. It’s useful for recording things off of both my iPad and my laptop. The LS-10 offers a level meter on its display, and on top of the volume level control, there’s also an input level control, which means I can keep track of the source through my earphone jack, even if I’ve paused recording. Just make sure that you shut down all the other applications on your source that might make some noise, such as email alerts or instant messenger notifications.
Recording Settings
A lot of devices have settings, if you take the time to look for them. Using them frequently helps if you want to adjust them to your own needs. Be mindful of the fact that most recording software applications have defaults that are intended for music, so their sampling rate might go as high as 44,000 times per second. On the other hand, if you just want to record voice sounds, then your sampling rate only needs to be in the range of 12,000 to 20,000 times per second. You can adjust various settings, such as the compression ratio, in order to fit your needs in terms of file storage. Simply put, as you go about compressing your encoding, the files you save are going to be smaller, but you’ll get worse sound quality. Be sure that you’re using settings which fit your needs. In short, try to use a recording to see if the quality is sufficient.
Having said that, one of the most crucial things in terms of making the recording that you’re going to share with others is being sure you don’t make a file too big. If you just use the default settings 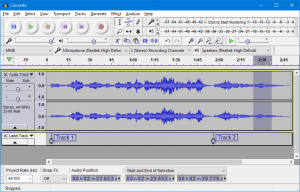 of the majority of software applications, then you’re going to end up with a file that could be multiple megabytes, even if the content is just a minute or two in length. On top of the sampling rate, be sure that you the settings are aligned for mono if you don’t want to record in stereo. Also, aim for as low a bitrate as you possibly can. For instance, when I record on my laptop, I don’t have the microphone jack that can do stereo, so I have little choice but to do mono recordings. For voice files, I put the sampling rate at 11025. When I save the file in a .mp3 format using Audacity, I do have options in terms of making it a variable or constant bit rate. Typically, I go for the constant bit rate, often dropped it to 32kbs or even less. Consider that most CDs with quality sound only have 128kbs. Given those settings, a few minutes of recorded sound winds up under a megabyte, typically just a few hundred kilobytes even. However, you must test these sounds to be sure that the quality is right and the size is okay.
Regardless of what operating system you have running, you need to be sure that the microphone you’re intending to use is, in reality, the one the recording software connects to. There is frequently an integrated microphone that comes with the laptop’s built-in webcam, and that’s typically the default microphone. If you’d like to use a USB headset or mic that is actually studio-level quality, then you need to be sure that microphone gets clicked on as the input, and then you can adjust the input level so that you’re getting a reasonable level. Not that your microphone input level isn’t the same as the speaker volume for that device. Such settings usually prove a bit unfamiliar to many users, so it might be necessary to hunt around the preferences and control panel in order to locate them.
Editing Notes
Depending on which audio recorder you choose to use, as well as the connecting cables and computer used for both exporting and editing, you might just have yourself a stereo file. In a case like this, then you should look at your file in Audacity. Here, you’re going to see a pair of tracks. Stereo is wonderful for music, and it works well for high-quality video voice-over. However, for most intents and purposes, you’re only going to need a single channel. In Audacity, you’ll rid yourself of one channel when you select Split to Mono somewhere in the waveform interface.
Just a hint: you should choose the louder of the two available.
Other software is able to accomplish this in many other ways, but after you split your tracks, you can just go in and delete whichever one you want. That can cut down your file size quite a bit without really reducing your quality at all.


